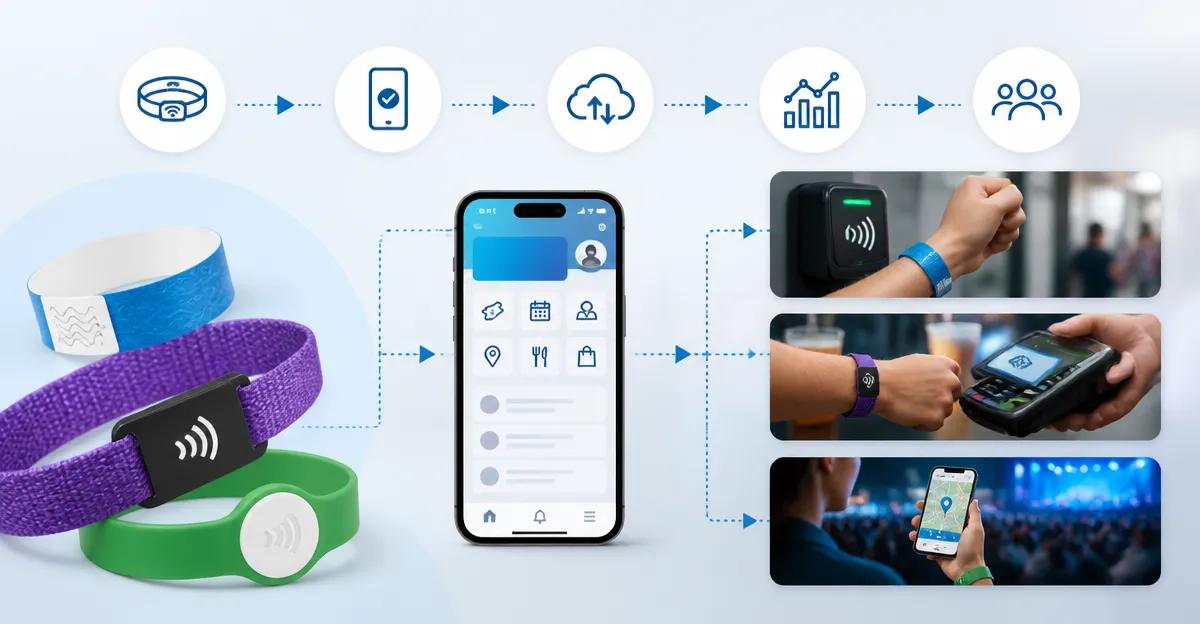
How to Integrate Custom Wristbands with Event Apps: Step-by-Step Guide to RFID, NFC & QR Code Integration for Seamless Access, Cashless Payments, and Attendee Tracking
Introduction
Event organizers increasingly rely on wearable technology to streamline entry, enable cashless purchases, and gather actionable data about participants. This guide explains how to integrate custom wristbands with event applications, covering Tyvek bands for basic identification, RFID bands for secure access and payments, and NFC bands for modern smartphone interactions. Readers will learn the required tools, the configuration process, and best practices to ensure a smooth experience for staff and attendees alike.
The value of this approach lies in reducing queue times, eliminating lost tickets, and providing organizers with real‑time analytics that can improve future events. By following the steps below, one can create a professional‑grade wristband system without extensive hardware investment.
What You’ll Need
- WristCo Tyvek Event Wristbands – 600‑piece 6‑color variety pack, $8.88, 4.8/5 rating.
- WristCo Custom Tyvek Wristbands – personalized design, $13.69, 4.7/5 rating.
- YARONGTECH RFID Silicone Wristbands – rewritable 125 kHz T5577 chip, pack of 5, $12.98, 4/5 rating.
- YARONGTECH 125kHz RFID Writable Wristband – larger 65 mm size, pack of 5, $13.79, 4/5 rating.
- YARONGTECH NFC Silicone Wristbands – 13.56 MHz ISO 14443A, pack of 5, $9.98, 3.7/5 rating.
- RFID/NFC writer device compatible with 125 kHz and 13.56 MHz chips (e.g., Proxmark 3, ACR122U).
- Event management software that supports API integration for wristband data (e.g., Eventbrite, Cvent, or a custom solution).
- Computer with internet access for uploading attendee lists and configuring the API.
Step 1 – Define Wristband Roles and Assign Colors
The first step is to map each wristband type to a specific event function. For example, Tyvek bands can denote general admission, while RFID bands can grant access to VIP areas and enable cashless purchases. NFC bands are ideal for on‑site scooter rentals or quick check‑in via smartphone.
Use the six colors included in WristCo Tyvek Event Wristbands to visually differentiate ticket tiers. The bright neon orange highlighted in customer reviews is especially useful for staff to spot quickly. Assign a color matrix, document it in a spreadsheet, and share it with security and hospitality teams.
Step 2 – Prepare Custom Designs (Optional)
If branding is essential, upload logos and text to the WristCo Custom Tyvek Wristbands configurator. The product prints designs in black ink on any selected color, ensuring high contrast and readability. According to reviews, the printed designs remain vivid even after three days of exposure to water.
When preparing artwork, avoid gradients and low‑resolution images, as the printing process only supports solid shapes. The bands measure 10 inches by ¾ inch, a size that fits most adult wrists comfortably.
Step 3 – Program RFID Wristbands
RFID wristbands require a unique identifier that matches the attendee record in the event app. Begin by connecting a compatible 125 kHz writer to your computer. The YARONGTECH RFID Silicone Wristbands use an original T5577 chip, which is blank until programmed. Follow these sub‑steps:
- Launch the writer software and select the "Write" mode for 125 kHz T5577.
- Import the CSV file containing attendee IDs, names, and access levels.
- Place a wristband on the writer antenna; the silicone material stretches to accommodate the 60 mm diameter.
- Write the unique ID to the band. The chip stores 330 bits, providing ample space for additional metadata such as balance for cashless payments.
- Verify the write operation by reading the band back. The reading distance is 0‑10 cm, so hold the reader close to the band.
The larger YARONGTECH 125kHz RFID Writable Wristband offers a 65 mm diameter, which may be more comfortable for users with larger wrists. Both products are waterproof and durable, making them suitable for outdoor festivals.
Step 4 – Program NFC Wristbands
NFC wristbands operate at 13.56 MHz and contain a pre‑programmed 4‑byte UID that cannot be altered. This characteristic simplifies deployment because the UID can be linked directly to a user profile without additional programming. Use an NFC writer such as the ACR122U to map each UID to the attendee record.
Steps:
- Open the NFC writer application and select "Read UID".
- Scan each YARONGTECH NFC Silicone Wristband to capture its unique identifier.
- Enter the UID into the event management platform, assigning permissions for access or payment.
- Test the wristband against a reader at the entrance to confirm successful linking.
Because the UID is immutable, it provides a high level of security against cloning. Reviewers noted successful integration with scooter‑sharing apps, demonstrating real‑world applicability.
Step 5 – Integrate Wristband Data with Event Software
Most event platforms expose RESTful APIs for attendee management. Create a script that reads the CSV generated in Step 3 and updates the platform via HTTP POST requests. Include fields for "wristband_id", "access_level", and "cashless_balance". Ensure the API key is stored securely and that HTTPS is used for all communications.
When using NFC bands, map the UID to the same fields. The integration enables the following capabilities:
- Instant gate validation – scanners query the platform in real time to verify access.
- Cashless transactions – point‑of‑sale terminals deduct amounts from the stored balance on the RFID chip.
- Attendance analytics – check‑in timestamps are logged for each wristband, providing insights into peak traffic periods.
Step 6 – Deploy Scanners and Train Staff
Place handheld or fixed RFID/NFC readers at entry points, food stalls, and merchandise booths. Configure each scanner to display a green light for authorized bands and a red light for denied access. Conduct a brief training session with security personnel, emphasizing how to handle tampered WristCo Tyvek Event Wristbands. The tamper‑evident adhesive ensures that a band cannot be removed without destroying it, which helps prevent reuse.
Provide staff with a quick‑reference guide that lists color codes, access levels, and troubleshooting steps. Encourage them to report any read errors immediately so that the support team can re‑program a replacement band.
Tips & Pro Tips
- Batch program RFID bands during off‑hours to reduce wait times on the event day.
- Store silicone bands in a dry environment; although waterproof, prolonged exposure to extreme heat may affect adhesive performance.
- Use the sequential numbering on Tyvek bands to reconcile physical counts with digital records after the event.
- Consider adding a QR code to the back of custom Tyvek bands for attendees who prefer smartphone scanning.
- Test all readers at the exact distance specified by the manufacturer (0‑10 cm) to avoid missed reads.
Troubleshooting
Problem: RFID band does not read.
Solution: Verify that the writer successfully wrote the ID by performing a read‑back test. Ensure the antenna is clean and that the band is positioned within the 0‑10 cm range. If the problem persists, re‑program the band or replace it with a fresh silicone wristband.
Problem: NFC wristband fails to pair with a smartphone.
Solution: Confirm that the device supports ISO 14443A. Some Android devices require NFC to be enabled in settings. If the UID is correctly stored in the event platform, the issue is likely on the device side.
Conclusion
By following this guide, one can create a robust wristband ecosystem that enhances security, simplifies cashless transactions, and provides valuable data for post‑event analysis. The combination of durable Tyvek bands for visual identification and programmable RFID/NFC bands for electronic functions offers flexibility for events of any size. Implementing the steps outlined will result in smoother entry flows, higher attendee satisfaction, and a measurable return on investment.
Products Mentioned in This Guide
Frequently Asked Questions
What types of wristbands can be integrated with event apps?
You can use Tyvek bands for basic ID, RFID bands for secure access and cashless payments, and NFC bands for smartphone‑enabled interactions.
Which hardware and software are required for RFID or NFC wristband integration?
You need compatible RFID/NFC readers, a wristband encoding device or printer, and an event app that supports API calls for authentication, payment processing, and data tracking.
How does the wristband integration improve attendee experience?
It reduces queue times, eliminates lost tickets, enables cashless purchases, and provides real‑time analytics for personalized services.
What are the best practices for configuring wristband data security?
Encrypt all transmitted data, use unique token IDs per band, enforce secure API authentication, and regularly update firmware on readers.
How can organizers troubleshoot wristband read failures on the day of the event?
Check reader power and antenna alignment, verify band orientation, ensure the band’s chip is not damaged, and confirm the event app’s connectivity to the backend server.